Frequent calls from telemarketers, spam and espionage – these are the main reasons I try to use the loyalty cards and other stuff, and if I have to – tend to have a long chat about how much I do NOT want to receive any calls/messages or ‘super special deals’. However, it doesn’t stop many telephone spammers. I have to admit, I understand how miserable wok in such a call center might be, when nine out of ten people you call tend to explode and shout on you. However, there’s always a chance the call would be so inconvenient, that it will make you go nuts.
Anyways, I decided to deal with those folks using some of my dark tech magic. If successful, the plan would not only ward off any spam, but also give me an everlasting supply of pure fun. I made an IVR for all the incoming calls and put it on a dedicated number I now began to willingly share. If you want to learn the details of setting up your very own Asterisk/FreePBX server that will handle GSM calls for you with some advanced features, this post has all the details.
Theory and planning
For a successful the counter-attack on telemarketers we need to do the following:
- Pick up and hold the caller for as long as we can. Inbound calls are free in Russia, outbound calls are not. Every advertisement budget is finite.
- Handle it all automagically, so that we would have to intervene as little as possible.
- Allow people you don’t want to share your main cell number with contact you anyway.
- OPTIONAL: Make sure the company positioning data by the phone operator is useless for this sim card. Nobody really knows how this stuff is handled in reality.
How can we make this happen? It’s simple, Watson! We need to bring up our very own VoIP server! Deploy Asterisk, plug in a USB voice modem for connectivity. Since it’s never gonna move, geopositioning data would be useless. For the old-school stationary phone line – we’ll get a cheap FXO gateway/hack a dialup modem/use something else. Okay, let’s get the job done.
The hardware
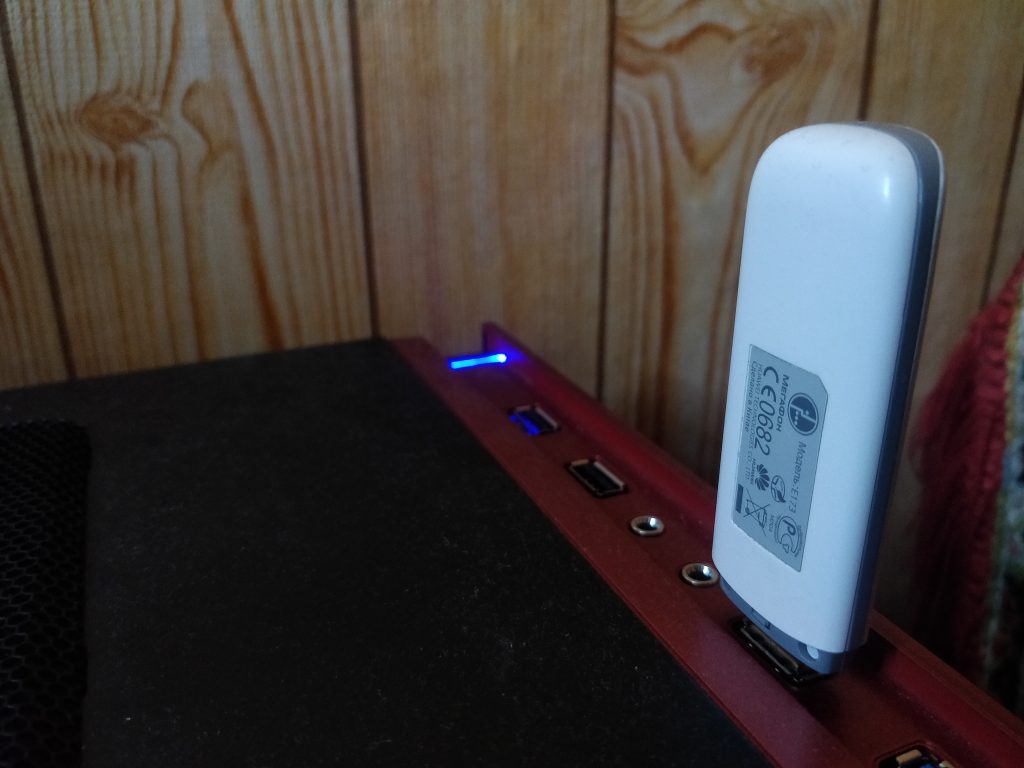
For this project I dug a few old 3g and 4g usb sticks I had around. One of them supported the voice function and was fully operational with chan_dongle plugin. Simple as that.
Software
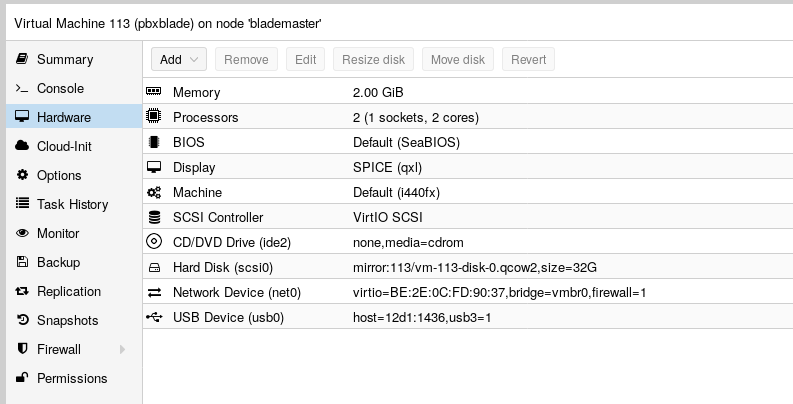
Let’s create a FreePBX VM and forward the USB modem there
So FreePBX is a popular asterisk web ui, that can help you set up your own telephony quite fast and for free (If you do not need any commercial plugins). It also comes as a ready-to-deploy distro. A modest hardware with 2 GiGs of RAM and one or two cores would be sufficient to handle telephony for an office of ~20 employees. For home use – we need even less.
Since currently I’ve switched to data cabling florida, I decided to set up FreePBX distro in a VM.
Let’s start by downloading the FreePBX ISO and placing in into /var/lib/vz/templates/iso on the proxmox server
cd /var/lib/vz/templates/iso
wget https://downloads.freepbxdistro.org/ISO/SNG7-FPBX-64bit-1910-2.iso
2GB of RAM, 2 cores, 30GB of hard disk. Should be enough. Perhaps, I could allocate even less, but since I have a plenty of RAM, I decided to keep it that way for now. Here are my VM settings.
I won’t cover the installation, since it’s VERY simple and right after that we get a snappy Web UI that will help us out with configuration. For security and simplicity I decided to disable the firewall, but never allow anyone outside my home network contact the FreePBX server. To use a Softphone I will either be on my home wifi or connect using a VPN.
Setting up FreePBX and connecting the first SoftPhone
Okay, let’s start. First, we’ll need to connect a few phone to our VoIP server. I used my cellphone for testing, just installed the MizuDroid app. For those of you not familiar with telephony, it’s usually called a SoftPhone.
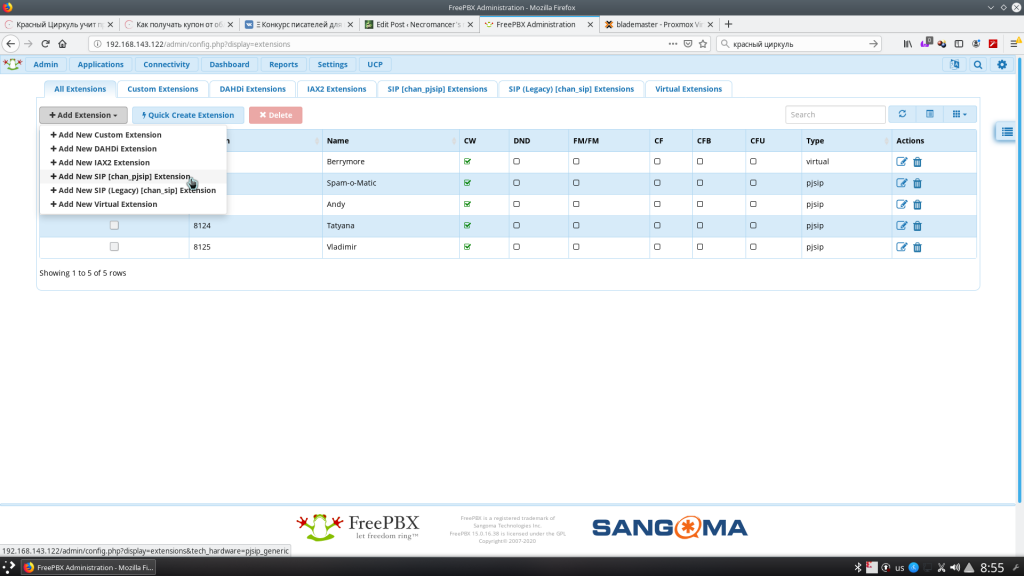
Since it’s the first time I’ve been dealing with telephony in my life, I’ll cover some ‘not-so-obvious’ terms. For instance, Extensions – ‘internal’ numbers you call within an organization are called like that. And this is what we’re going to create first. We can add it as a sip or pjsip type. The only difference is what implementation will handle it. sip is older, pjsip is newer and supports more stuff. I decided to live with PJSIP.
Let’s first create our chan_pjsip extension and connect the softphone to it. To do so, navigate to Applications -> Extensions in the WebUI.
You’ll need just a few options. The most important is ‘Secret’. It’s the password you’ll need to fill in in your SIP app settings.
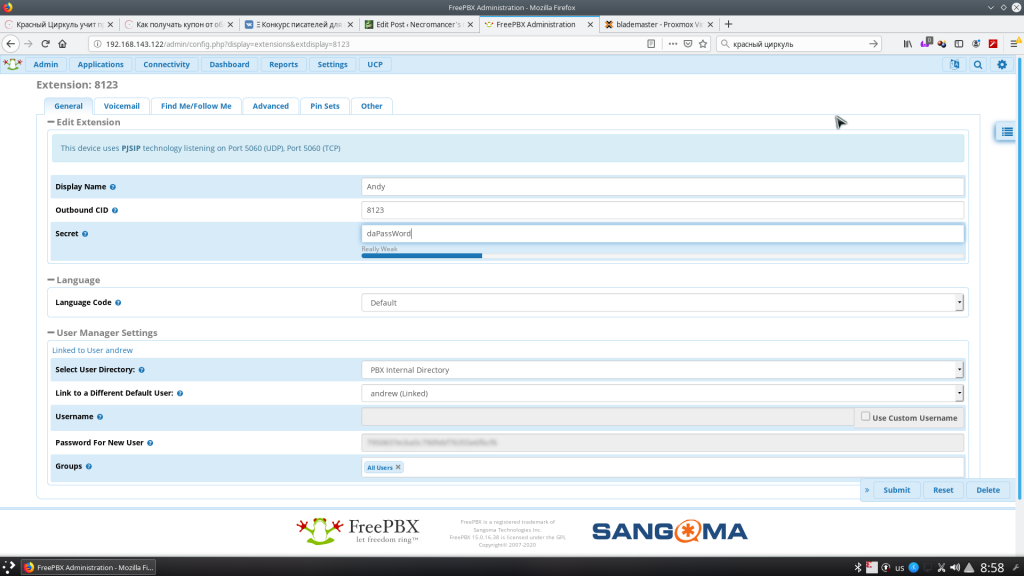
We can leave the rest as is. The defaults are pretty sane. Now just click submit and apply config buttons.
Before we start setting up MizuDroid, log in to the FreePBX shell and stop fail2ban. This daemon analyses logs and bans adresses. Excessive invalid login attempts will cause the IP of the softphone to get banned for a while. Good for production use, harmful while debugging.
systemctl stop fail2banOnce MizuDroid is authorised and registered, we can try calling any number we want and we should hear a nice girl telling us we’ve called the wrong extension.
Creating an IVR and testing it out
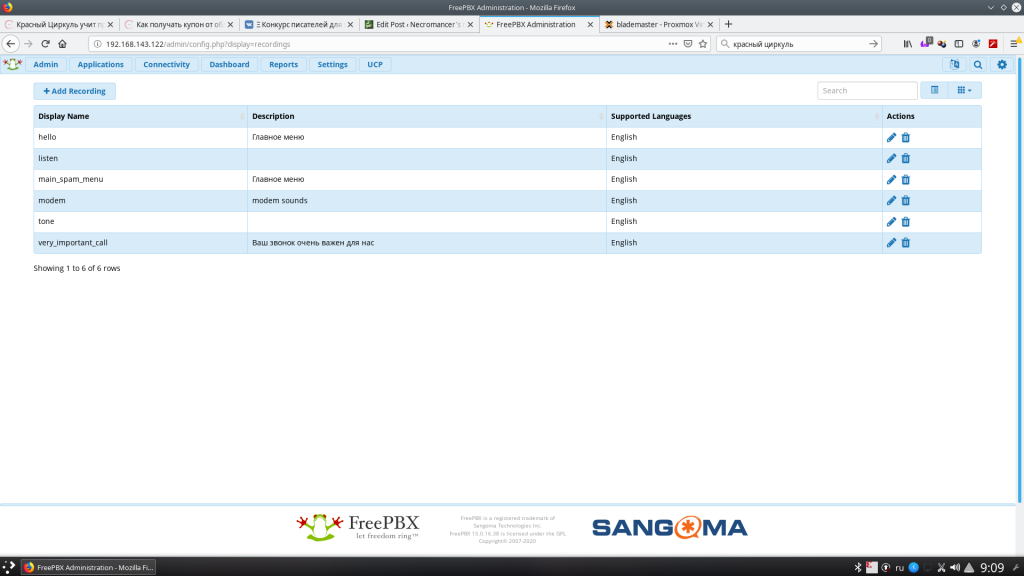
This is one of the most important things of our setup. Tell everybody to get out or find a silent place and record a few voice prompts. Try not to laugh or sound too weird (Took me a good amount of time and practice. Turned out to be hardest part) What we’ve recorded we need to upload to Admin -> System Recordings and give the recordings their respective names.
After we’ve done all our recordings, let’s navigate to Applications -> IVR. This is where we can create the interactive voice menu to deal with spammers. An option in IVR may be linked to another IVR, because… well, why not? Free time and our imagination are the only things that limit our choices here. I’ll leave all the configuration for you, just point out a few of the common pitfalls:
- If we want to give the caller an option to dial the extension number directly – it’s better to make it a separate IVR. There, enable “Direct Dial” and check the “Force Strict Dial Timeout”. The Timeout should be something like 5 seconds or so. Otherwise, you’ll be always missing one number that will be interpreted as if the caller selects an option.
- Keep a few seconds of silence at the start of the recordings. GSM networks tend to ‘chew up’ a second or two at the start of the call. Besides, we would normally want the caller to start talking first.
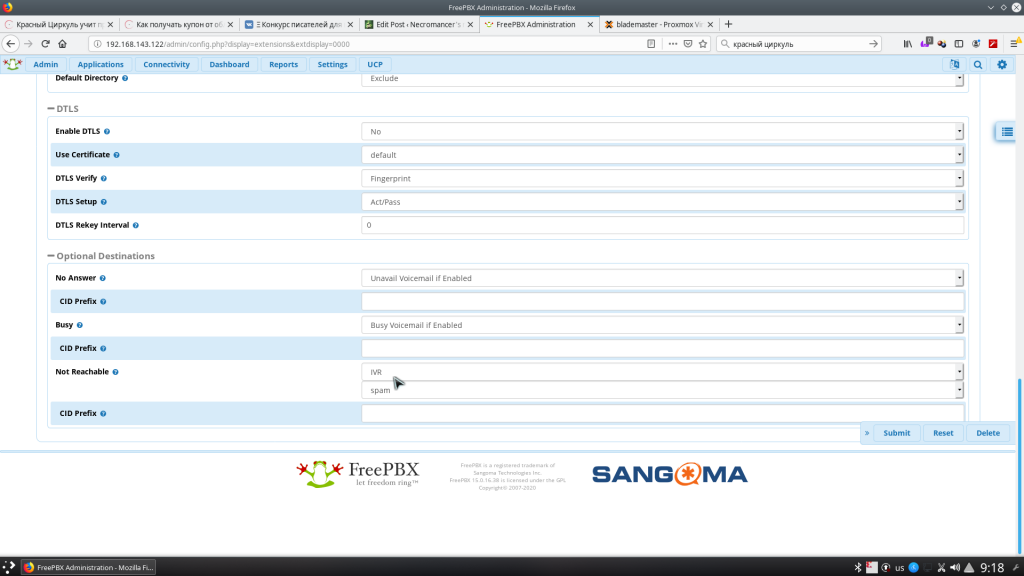
Now we need to direct the calls to our IVR. Let’s create a ‘virtual’ extension. You can do so in Applications->Extensions. I created two extensions 0000 and 0001 while playing with the settings. In “Advanced” tab select the “Not Reachable” entry as “IVR” and select the name of the IVR we’ve just created.
Press “submit”, then the BIG RED BUTTON called “Apply Config” and once it’s up – dial 0000 from our softphone. If we hear the IVR menu – we’re doing it right! Now, let’s set up the GSM networking for fun and profit.
Setting up GSM connectivity
Preparing the modem
Perhaps, for those who don’t know, I should tell a little about what most usb modems are.
A typical usb modem is a composite USB device. It appears as a bunch of serial ports, a network interface (For newer modems. qmi, ncm, ndis and others). Optionally – a virtual cdrom with windows drivers and a usb mass storage device for builtin card-reader (if any). The set of functions that are exposed to the OS is configurable, and sometimes you’ll only see a virtual cdrom unless you send some weird stuff to the modem so that it would switch functions.
Serial ports are the most interesting thing all modems have. Most accept plain old AT-commands that allow you to call, send sms messages, access internet and do pretty much anything with the modem. Older modems provide internet connectivity via those same serial ports, newer use serial ports to setup internet connectivity and use a virtual network adapter for actual data transfer.
What conserns voice calls, some chipsets have analog audio that is most likely never wired via usb, but some (namely, certain huawei modems) have audio transferred via a dedicated virtual serial port. That’s exectly what we need and that was exactly what I found in my ‘big electronics dumpster’.
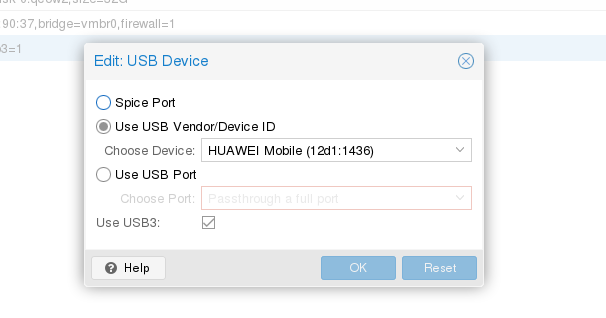
Passing the modem through to the virtual machine
The tricky part is, that when you switch modem modes via usbmodeswitch, vendor id and product id change. Therefore, you have a few options: Forward a usb port to VM permanently, setup usbmodeswitch on the hypervisor itself (proxmox) and forward the 3g stick after switching. You can also disable the virtual cdrom for good using this AT command
AT^U2DIAG=0I decided to settle for usbmodeswitch on the proxmox side. To do this just type this magic and you are ready to go:
sudo apt install usbmodeswitchNow, let’s replug the modem and check dmesg. We should see a bunch of serial ports.
[    7.664080] usbserial: USB Serial support registered for GSM modem (1-port)
[    7.664111] option 2-1:1.0: GSM modem (1-port) converter detected
[    7.664168] usb 2-1: GSM modem (1-port) converter now attached to ttyUSB0
[    7.664193] option 2-1:1.3: GSM modem (1-port) converter detected
[    7.664233] usb 2-1: GSM modem (1-port) converter now attached to ttyUSB1
[    7.664240] option 2-1:1.4: GSM modem (1-port) converter detected
[    7.664292] usb 2-1: GSM modem (1-port) converter now attached to ttyUSB2
[    7.730440] ppdev: user-space parallel port driver
Good, now let’s forward that to our virtual machine.
Setting up chan_dongle
Still here? Great. Now let’s setup mobile network connectivity for asterisk. We’ll need to compile and install chan_dongle for that. There will be a few pitfalls with it, but nothing really bad. Let’s login to our FreePBX VM via ssh and type in the following magic:
yum -y install tcl asterisk16-devel make automake binutils git
git clone https://github.com/wdoekes/asterisk-chan-dongle.git
cd asterisk-chan-dongle/
aclocal && autoconf && automake -a
./configure --with-astversion=16.4.1 --prefix=/usr
make
make install
What’s very important here? First of all we’ll need asterisk’s header files (asterisk16-devel), and specify the correct asterisk version at the .//configure step. We can find it out by typing asterisk -r, and then typing exit. At the moment of writing this very post, mine was 16.4.1
[root@freepbx ~]# asterisk -r
Asterisk 16.4.1, Copyright (C) 1999 - 2018, Digium, Inc. and others.
Created by Mark Spencer <[email protected]>
Asterisk comes with ABSOLUTELY NO WARRANTY; type 'core show warranty' for details.
This is free software, with components licensed under the GNU General Public
License version 2 and other licenses; you are welcome to redistribute it under
certain conditions. Type 'core show license' for details.
=========================================================================
Connected to Asterisk 16.4.1 currently running on freepbx (pid = 2492)
freepbx*CLI>
Now let’s create/edit the /etc/asterisk/dongle.conf file. I made it up from a bunch of tutorials on the web. See comments inside
[general]
interval=15

[defaults]
rxgain=0 ; - Receive audio gain. Increase to hear more background chat
txgain=0 ; - Transmit audio gain. Increase if you want to shout
language=ru ; - May be used for IVR
dtmf=relax ; - Folks recomment this one.
context=from-gsm ; What context SMS and calls arrive
autodeletesms=yes ; Delete incoming SMS messages once they are received

[dongle0]
extern=+7XXXXXXXXXX ;Our SIM card number
imei=XXXXXXXXXXXX ; IMEI of our modem
In dongle0 section we can specify either IMEI, or manually all serial ports chan_dongle is going to use. Automatically detecting ports looks like the best option (e.g. there’s no other serial ports with actual hardware, since it’s VM, why not?)
But, before we start working with chan_dongle there are a few other key moments. Most other tutorials missed them, so I decided to fix it.
Fixing /dev/ttyUSBx and /var/lock permissions at boot time
Default chan_dongle installation has a problem with permissions for /dev/ttyUSBX and /var/lock directories.
The first one can be fixed by placing a proper udev rules file (/etc/udev/rules.d/92-dongle.rules) and reloading udev (or rebooting)
KERNEL=="ttyUSB*", MODE="0666", OWNER="asterisk", GROUP="asterisk" The second… Well, I kind of cheated and did a chmod 777 on /var/lock at boot, by placing this file into /etc/systemd/system. Please let me know in the comments if you know a cleaner way to fix it.
[Unit]
Description=Makes /var/lock world-writable
After=network.target

[Service]
Type=simple
ExecStart=/usr/bin/chmod 777 /var/lock/
TimeoutStartSec=0

[Install]
WantedBy=asterisk.service
Configuring own number in the modem itself
If we don’t do it, CallerID and DID’s won’t be handled correctly and other weirdness will happen. To fix it, type the following magic into your asterisk commandline. Replace +7sim_number with your phone.
asterisk -r
freepbx*CLI> dongle cmd dongle0 AT+CPBS=\"ON\"
freepbx*CLI> dongle cmd dongle0 AT+CPBW=1,\"+7sim_number\",145
Forwarding SMS messages to telegram
That’s not something out-of-the box for asterisk or FreePBX, so we’ll need a hack here.
Let’s open up /etc/asterisk/extensions_custom.conf and type in the following magic:
[from-gsm]
include => from-pstn

exten => sms,1,Verbose(Incoming SMS: From: ${CALLERID(num)} ${SMS_BASE64})
exten => sms,n,System(/usr/local/bin/sms2tg.py '${STRFTIME(${EPOCH},,%Y-%m-%d %H:%M:%S)} - ${DONGLENAME} - ${CALLERID(num)}:' ${SMS_BASE64})
exten => sms,n,Hangup()

exten => ussd,1,Verbose(Incoming USSD: ${USSD})
exten => ussd,n,System(echo '${STRFTIME(${EPOCH},,%Y-%m-%d %H:%M:%S)} - ${DONGLENAME}: ${USSD}' >> /var/log/asterisk/ussd.txt)
exten => ussd,n,Hangup()
This will log all USSD queries to /var/log/asterisk/ussd.txt, and feed all SMS messages in BASE64 to our small /usr/local/bin/sms2tg.py script
sms2tg.py, as you might have guessed, will be our own creation. We’ll need to create our own telegram bot for that. I won’t cover it here – just leave a link. This tutorial is already long enough.
Once we have an API key и Chat ID we can deploy all the needed things on our FreePBX box. Let’s start by installing some packages we need.
yum install python36u-pip
pip3.6 install pytelegrambotapi
Now, let’s creat the /usr/local/bin/sms2tg.py script. (Don’t forget to change API:KEY & CHATID with your own).
#!/usr/bin/python3.6
import base64
import telebot
import sys
bot = telebot.TeleBot('API:KEY')
chat_id = CHATID

import codecs

message =  base64.b64decode(sys.argv[2])
message = message.decode('utf-8')

log = "SMS from: " + sys.argv[1] + " " + message + "\n\n"

text_file = open("/var/log/sms", "a+")
text_file.write(log)
text_file.close()


ret = bot.send_message(chat_id,
    "Incoming SMS: \n" +
    sys.argv[1] + "\n" +
    message
    )
The script will log all decoded messages to /var/log/sms and send it to our telegram. There’s just a small problem here. If your live in Russia, telegram is (officially) blocked (though, it works with no problems on every phone). But api.telegram.org should be routed via VPN or proxy. I won’t cover routing in this tutorial. It huge already and I’m tired translating it.
Recording everything we hear. Everything.
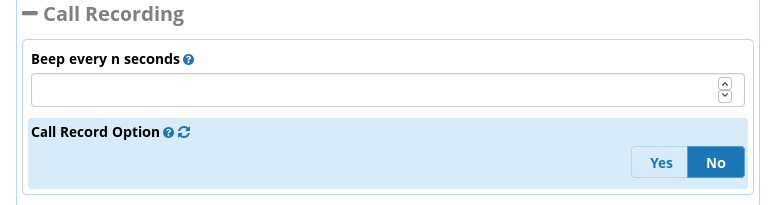
This took me a long while to figure out. The setting is not-so-obvious and buried so deep in FreePBX, so you’d never guess it’s there. Open up FreePBX Web UI and navigate to Settings->Advanced Settings. There, you’ll find ‘Call Record Option’. Set it to “No”. (Yep, you read it right. “No”). Now it will record everything, starting from the very moment asterisk picks up the phone. Just don’t forget to follow the law and warn people, that they are being recorded and all they say will be made into pure lulz 😉
Setting up the TRUNK
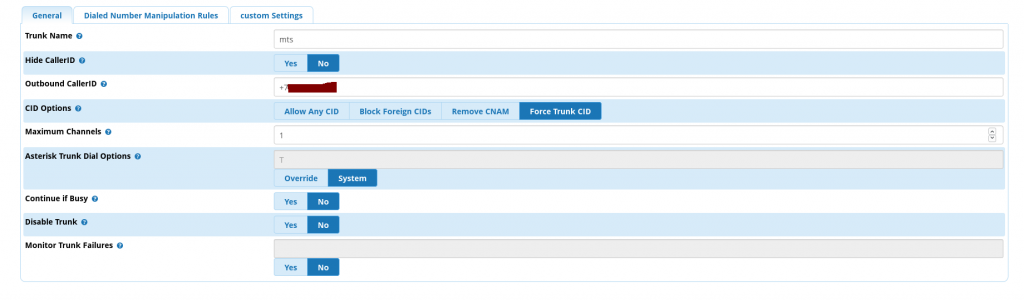
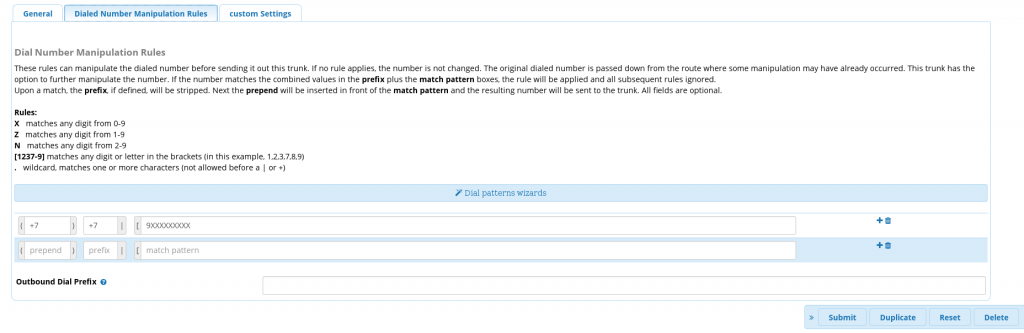
Are you still here? Perfect. Now let’s set up our trunk for calls from FreePBX. Navigate to Connectivity->Trunks and create a new trunk with type ‘custom’. My settings looks somewhat like this. In Outbound Caller ID write your SIM card number.

Inbound routing
If you’ve kept reading till this moment, I envy your patience. Or, perhaps you’re setting this thing yourself? Either way, good luck. Now, let’s configure the routing. Jump to Connectivity -> Inbound Routes. And now we can route all incoming calls from GSM to an extension, where we’ve set up our IVR.
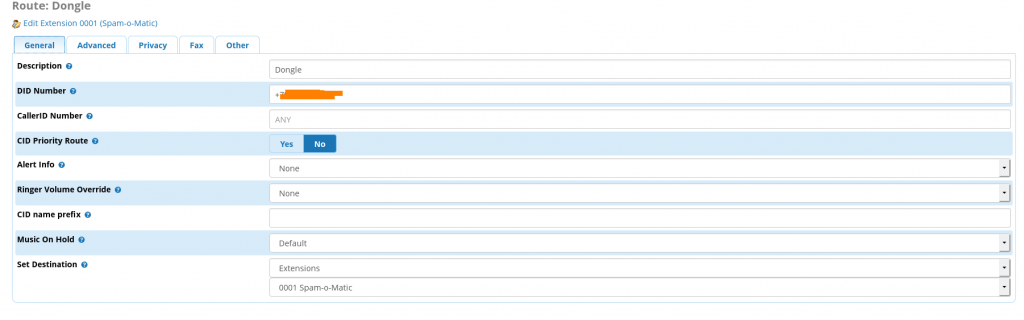
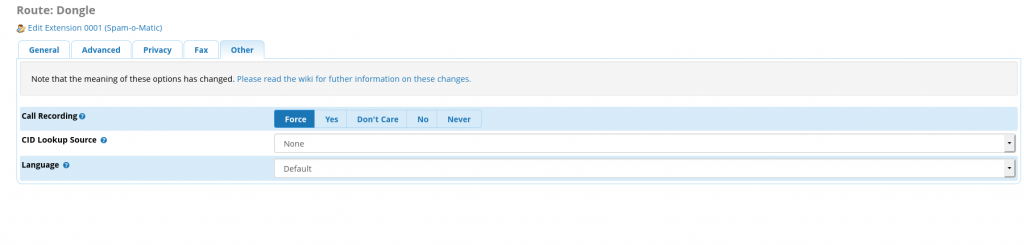
In ‘Other’ tab set “Call recording” to “Force” to record every call that arrives.
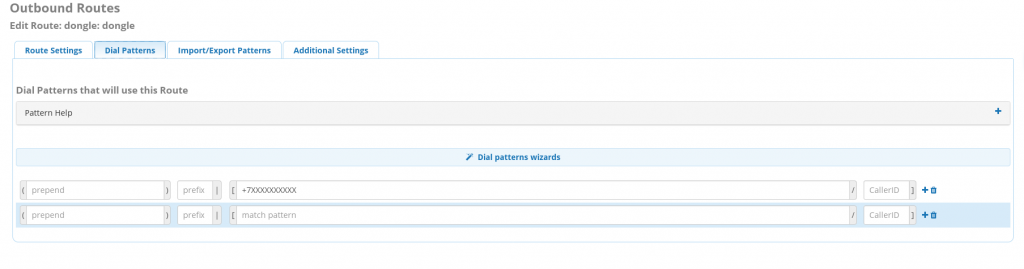
Outbound routing
This is a nice bonus. If we don’t want to expose our ‘real’ number, we can dial from our “trash” phone number using SIP. We can call questionable services that may spam us later with marketing, or just call people we don’t want to share our real phone number with. Besides, we can use it to make calls from abroad and avoid roaming costs. This is pretty much like WiFi Calling, but homebrew. My outbound routing looks like this:
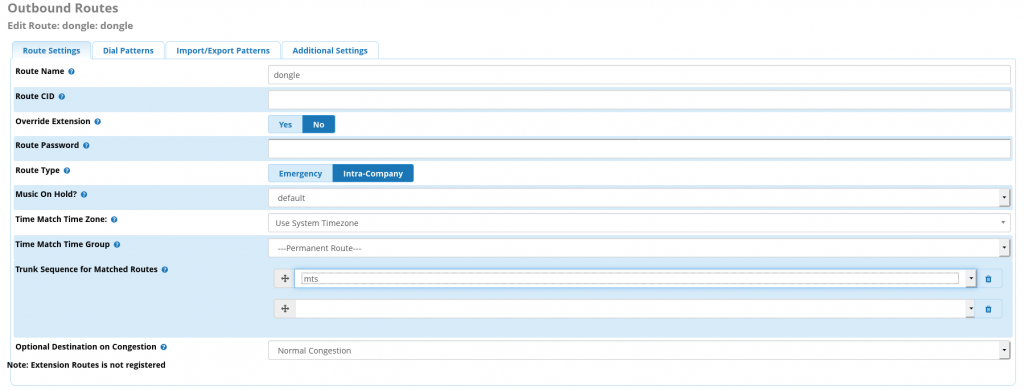
The rest we can keep as is, defaults are pretty much sane.
Sending all call records to our telegram account
The main idea behind this madness was not only getting rid of telemarketers, but also turn it into a regular supply of fun, also know as ‘lulz’ in the internets. Therefore, we’ll need to deliver call recordings to our telegram as well. We can then use the recordings to further improve the IVR. To do so we’ll need to dive, once again, to some of the hidden and undocumeted features of FreePBX.
First, navigate to Settings->Advanced Settings and set ‘Display Readonly Settings’, “Override Readonly settings” to “Yes”

Now let’s setup a script, that will handle recorded calls. Fill in the ‘Post Call Recording Script” field. The value will look like this.
/usr/local/bin/voicecallhandler.sh ^{TIMESTR} ^{CALLFILENAME} ^{CALLERID(number)}Now, let’s create the /usr/local/bin/voicecallhandler.sh script. Mine looks somewhat like this. It’s a reworked version of something I found over at FreePBX forums. The script should encode .wav to .mp3 and send it via telegram.
#!/bin/bash -x
# This script emails the recorded call right after the call is hung up. Below are the variables passed through asterisk
# $1 - Time String
# $2 - File
# $3 - Caller id

/bin/nice /bin/sleep 3

dy=$(date '+%Y')
dm=$(date '+%m')
dd=$(date '+%d')
file_age=35
dtpath=/var/spool/asterisk/monitor/$dy/$dm/$dd/

/bin/nice /usr/bin/lame -b 16 -m m -q 9-resample $dtpath$2.wav  $dtpath$2.mp3
/bin/nice /bin/chown  asterisk:asterisk $dtpath/$2.mp3

dt=$(date '+%m/%d/%Y %r')

echo $dt

exten=${str:4:4}
# the above exten takes the string of $4 which is the Channel name
# this is key in finding who recorded the call and who the call with
# Example: SIP/2212-00000100
# the exten =${str:4:4} takes the string str which is the example above
# then looks for the 4th position in string and it starts the extension number after that
# Then it takes the second number 4 and says to grab that number of characters and associate with the
# variable exten. leaving me with 2212 if your extensions are different then 4 characters only change the
# second number 4 above to the extension length you have
filename=$2
sfile=$dtpath$2.mp3

shift
shift
from=$*
/usr/local/bin/call2tg.py "$from" $sfile
The actual delivery is handled by another script, called /usr/local/bin/call2tg.py, that looks really similar to the previous one and is also quite dumb.
#!/usr/bin/python3.6
import base64
import telebot
import sys
import codecs

bot = telebot.TeleBot('API:KEY')
chat_id = CHATID

voice = open(sys.argv[2], 'rb')
bot.send_message(chat_id,
    "Got a new voice call: \n" +
    sys.argv[1]
    )
bot.send_voice(chat_id, voice)
P.S. Don’t forget to chmod +x all the scripts you create to make them executable.
Field testing
Now, once everything was up and running I could give the sim number to anyone. Super special discounts if I leave my phone number? Sure, why not. It’s funny, but when instead of rejecting to share your number with any salesman you agree and say ‘sure, why not” not only it feels psycologically better, but it also makes them so happy… I guess, I’ve just made the world a little bit happier. I though about it on my way to work, when something interrupted my thoughts.
“Answer a few questions on your food preference and get 100 roubles for free to your phone!”. A middleaged woman standing near the metro station had a really loud voice.
“Why not?”. That’s what I thought. After all, I somehow have to pay the bill for my ‘secondary’ cell phone number.
What next?
It took me about a month of setting things here and there, I’ve asked a lot of friends to test the system out. A lot of thanks fly out to the awesome people who helped me out and pointed at bugs in my setup. I’ve also got the first recordings of my bot talking with other robots… Guess that’s the cyberpunk we’ve earned.
So far the next steps are:
- Teach my bot to “correctly” answer questions like “Do you want to learn more?” to fight it’s way to a living person.
- Finish up and document the FXO gateway setup, that connected my setup to the city phone line. It’s like a reservation with a lot of wild telemarketers.
- Teach it to send the right DTMF code, when the robots calling you want you to press a button, to talk to a living person.