It’s been a long while I wanted to check for how long can an esp8266 with esphome last on a battery supply. Yet I didn’t have a reason to get it done. Time to fix that and add yet another battery optimization manual for ESP8266 to the internets.
And what’s the big reason? The story is simple. I decided to try ‘cold water immersion’ practice and make it a habbit.Yep, not the cold showers, but true hardcore ‘CWI’. I started back in summer when it was hot as hell and went all the way through to November. The weather gradually lowered the water temperature for me from ‘ah, cool and nice’ to ‘Awh shit this is cold!11’. Ideally that would become a habit.
However in November I had to pause that for a few weeks. And that meant the only thing: I had to start over again. And since the weather isn’t helping me any more, I’d have to take care and gradually decrease the temperature myself.
The first idea was to just order a dumb water thermometer. But why order when you have all the parts in stock and can just build one? And with cool features!

The hardware
The hardware for this project was pretty dumb. I partially populated a board from a different project, keeping only the bare minimum: esp8266 module, 3.3 Volts DC-DC, DHT11 desoldered from a different board, but still functional and most importantly – a ds18b20 sensor on a long wire. I also added a 18650 cell holder and plugged a 18650 LiIon Battery there. And that’s all. The enclosure was also from the stuff I had around. Too big, judging by the looks, but who cares?
The LiIon cells were not perfect. About seven years ago a shady Chinese vendor sold me some utter crap. They were no way near 4000mAh as described. Most of them were already disposed, but I had two still around. A quick test revealed that they still had a whooping of 400mAh of capacity. That would do just fine.
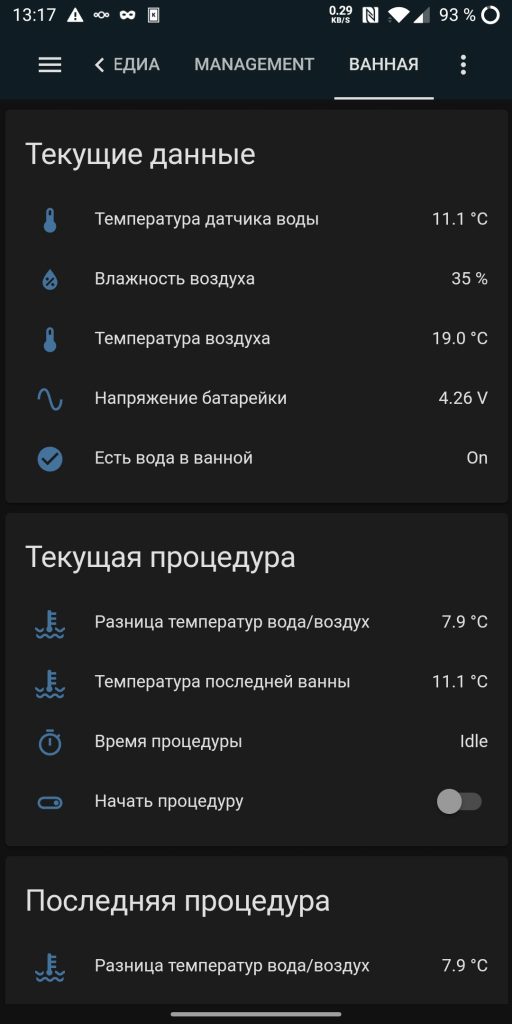
So, what are we monitoring?
We’ll need to take care of two parameters: water (ds18b20) and air (dht11) temperatures. The temperature difference should theoretically match how cold ‘it feels’. I really wanted my feelings against hard sensor data. Humidity is another metric we get for free from DHT11. Though, I didn’t find a way to actually use it. Water presence can be determined using water/air temperature difference. If it’s more than 4 degrees – most likely there’s some water, right?. We’ll later use this stuff for powersaving. When we’re just getting the water ready – we need more regular feedback from the UI, and for the rest of the day it can just do some rare checks waiting for the water to appear in the bath.
Test one: Powersaving off
I used my simple esphome configurtion template to connect to Home Assistant via API, pumped the values once every minute. The thing lasted for 6 hours, the battery voltage fell all the down to 2.5 volts, which is the voltage the esp8266 went dark. If we do some simple math we’ll get those 70mA of power consumption folks reported back in 2015 or so when those devices just started to appear on the market.
At that point I understood that I’ll have to do some pretty hard power optimization and the cool tutorials on the internet were definitely NO WAY near what I really wanted.
Mving to MQTT
Esphome hass 2 ways to send data to Home Assistant: API & MQTT.
- API – Home Assistant periodically tries to connect to the device, once connected keeps the connection open and communicates on it’s own,
- MQTT – ESP8266 connects to MQTT broker and pumps data there periodically.
The second option looks just like what we need, so I’ve changed the following line in my config:
api:
for these lines:
mqtt:
  id: mqtt_cli
  broker: homeblade.home
  username: xxxx
  password: xxxx
  birth_message:
  will_message:
Since I don’t want to see Unavailable whenever he device is sleeping, I’ve set birth_message/will_message to empty values for the device to appear as always available.
Adding deep sleep
I soldered GPIO16 and RESET pins with a drop of solder and opened up the docs. This was the part where the magic began. The primary way to get deep sleep running – add the following to the config.
deep_sleep:
  run_duration: 10s
  sleep_duration: 10min
This way we’re working for 10 seconds, sleeping for 10 minutes and so on. Not bad, but how much time to we need to connect to a WiFi hotspot, get all the data and send it? More or less? And this interval may differ depending on the wireless traffic and interference. Instead of that I settled for a less documented, but way more powerful lambdas, that allow you to add C++ code just into your yaml. The deep sleep part ended up being way shorter:
deep_sleep:
  id: sleepy
Next I added globals and script sections. The script will do all the required magic and run once at boot. I also added the update_interval: never lines to all sensors. We’ll update those manually every boot.
globals:
  - id: updates
    type: int
    restore_value: no
    initial_value: '0'
script:
  - id: check_stuff
    then:
    - lambda: |-
        id(updates) = 0;
        id(bat).update();
        id(dallashub).update();
        id(dhts).update();
    - wait_until:
        lambda: |-
          return (id(updates) >= 4);
    - deep_sleep.enter:
        id: sleepy
        sleep_duration: 5m
dallas:
  - pin: GPIO12
    id: dallashub
    update_interval: never
sensor:
  - platform: dht
    pin: GPIO0
    model: DHT11
    id: dhts
    temperature:
      name: "$devicename Temperature"
      id: dht_temp
      on_value:
        lambda: |-
          id(updates)++;
    humidity:
      name: "$devicename Humidity"
      on_value:
        lambda: |-
          id(updates)++;
    update_interval: never
  - platform: adc
    id: bat
    pin: GPIO17
    name: "$devicename Battery Voltage"
    filters:
      - multiply: 6
    update_interval: never
    on_value:
      lambda: |-
        id(updates)++;
  - platform: dallas
    index: 0
    id: water_temp
    name: "$devicename Water Temperature"
    on_value:
      lambda: |-
        id(updates)++;
What’s the catch here? It seems that the manual call to update() on a sensor object may update the value immediately or may just start the asynchronous update. So I quickly calculated the number of sensors I needed to poll and added a global variable. Once updated, they increment the global variable ‘updates’. And in the script we asynchronously wait for the updates to be 4 or more. At this point we move on to deep sleep. This trick worked like a charm and I moved on to other hacks.
Optimizing WiFi power consumption
So the main usage now is pretty dumb: sleep for as long as possible, wake up, get and send the sensor data, and got to sleep as fast as possible. The faster we get connected to the wireless network – the better. That means that we have to adjust the wifi section in a few places. After checking out a few leads, esphome documentation and my own thoughts, I ended up with the following:
- Turned on fast_connect. This way we won’t do a full scan but connect to the first matching network. In case of 802.11r environment we’ll need to fill in the channel,
- Set up powersaving to LIGHT (power_save_mode: LIGHT). Perhaps, we could go on to something more extreme, but I decided to keep things easy for now,
- Ditched DHCP in favor of a static IP (Faster IP setup, less traffic – more power saving)
- Set up MQTT server IP adress instead of DNS name. Less DNS lookups, faster operation, less traffic, less wasted energy.
Resulting config part looked something like that:
wifi:
  power_save_mode: LIGHT
  fast_connect: true
  networks:
  - ssid: xxxxx
    password: xxxxx
  manual_ip:
    static_ip: 192.168.3.31
    gateway: 192.168.3.1
    subnet: 255.255.255.0
    dns1: 192.168.3.1
Make deep sleep interval dynamic
This is very useful. When you’re just getting the water ready you’ll need a faster poll interval. The rest of the day we may poll the sensors only occasionally to detect a bath being filled. I picked 7 minute intervals when there’s no water in the bath and 1 minute when there is water. And how are we going to detect water resense? Simple! Let’s just poll the difference of air and water temperature. If it’s 4 degrees either way – most likely there’s water.
In other words I’ve ended up with yet another global variable and another lambda.
globals:
  - id: naptime
    type: int
    restore_value: no
    initial_value: '300'
script:
  ...
  - lambda: |-
          float df = abs(id(dht_temp).state - id(water_temp).state);
          if (df > 4.0) {
            id(water_presense).publish_state(1);
            id(naptime) = 60;
          } else {
            id(water_presense).publish_state(0);
            id(naptime) = 420;
          }
The command to enter deep sleep also changed a little bit:
          - deep_sleep.enter:
              id: sleepy
              sleep_duration: !lambda |-
                  return id(naptime) * 1000;
Adding our script to autostart
Initially I just made a switch that fired up my script. This way I could debug it using OTA updates, instead of using uart. But once deep and everything else was working perfectly it was the time to make it run autimatically every boot.
esphome:
  name: $devicename
  platform: ESP8266
  board: esp_wroom_02
  build_path: build/esp8266auto
  on_boot:
    - priority: -300
      then:
        - script.execute: check_stuff
Getting rid of debug messages
The less weird stuff we do with text, the better:
logger:
  baud_rate: 0
  level: NONE
Adding OTA updates the proper way.
It’s hard to do OTA updates when the hardware is mostly asleep. You have to either flash via UART, or do some stuff to prevent deep sleep. The recommended solution looked somewhat like this:
mqtt:
  id: mqtt_cli
  broker: homeblade.home
  birth_message:
  will_message:
  on_message:
    - topic: $devicename/ota
      payload: 'ON'
      then:
        - lambda: |-
            id(ota_mode) = 1;
So we monitor an MQTT topic for $devicename/ota, if we see ‘ON’ there, we set a magic variable that blocks sleeping. However there was a small catch. Even when I had that message set (ith retin flag, so that it would be delivered almost instantly), it just didn’t arrive fast enough to prevent the hardware from entering the next deep sleep cycle.
After thinking it over, I navigated to my Home Assistant config file (IMPORTANT! Not the esphome config this time!) and added a couple of MQTT switches:
switch:
  - platform: mqtt
    command_topic: "cryotool/ota"
    state_topic: "cryotool/ota"
    unique_id: cryotool_ota
    name: "Cryotool OTA Mode"
    icon: "mdi:upload"
    retain: true
  - platform: mqtt
    command_topic: "cryotool/session"
    state_topic: "cryotool/session"
    unique_id: cryotool_session
    name: "Start cryotool session"
    icon: "mdi:content-save"
    retain: true
First is needed for OTA updates, the other one for saving the session data (later about that!). It’s important that state_topic and command_topic are set to the same topic and have the retain flag set.
Now, back to esphome config. I added to my (already starting to look scary) check_stuff script even more lambdas.
    - lambda: |-
        id(mqtt_cli).subscribe("$devicename/ota", [=](const std::string &topic, const std::string &payload) {
          id(ota_mode) = (payload.compare("ON") == 0);
        });
        id(mqtt_cli).subscribe("$devicename/session", [=](const std::string &topic, const std::string &payload) {
          id(session) = (payload.compare("ON") == 0);
        });
This is done before polling sensors, so by the time we finish polling them, MQTT will tell us all we need to know. If we have ON set, we disable sleep and wait for a new firmware to be uploaded. And when we receive the firmware payload we flip the switch back.
script:
...
    - if:
        condition:
          lambda: 'return id(ota_mode) == 0;'
        then:
          - deep_sleep.enter:
              id: sleepy
              sleep_duration: !lambda |-
                  return id(naptime) * 1000;
ota:
  safe_mode: True
  password: xxxxxx
  on_end:
     then:
      - lambda: |-
          id(ota_mode) = 0;
      - mqtt.publish:
          topic: "$devicename/ota"
          payload: "OFF"
          retain: true
Other usefull stuff
I added two different copies and temperature data. One for current session, one for last session. Current session data is only updated when there is water present. Last session data is only updated when we enable the ‘Save session’ switch in Home Assistant UI. This way we will end up with nice charts documenting the process of becoming a Yeti ;).
The final test
I left the device running in bathroom when I was away from home for about a week or so. 400 shady Chinese mAh ended up in about 9 days of uptime (25 november to 3rd of december. unfortunately, Home Assistant dosn’t plot dates on the chart). The thermal sensors die a little bit earlier since ds1b20 works from 3.0 volts and on, and esp8266 – 2.5 volts and above. That doesn’t make a big difference since the voltage is falling really fast anyways. And something tells me those cells don’t even have a BMS making the pretty much unsafe to use.

Typical voltage of a CR2032 is about 200mAh. Judging by the data above that would give something about 3-4 days of operation. We can further optimize power consumption by desoldering a couple of LEDs, switch out DC-DC for a better one, drop the electrolytic capacitors or add a step-up DC-DC that will squeeze every last milliamp from our CR2032. But for this project it would be most optimal to just add a normal 18650 cell with a proper BMS (looks like these batteries have just no BMS whatever) and implement low voltage cut-off with setting the state as unavailable in Home Assistant.
Implementing low voltage cutoff (kind off)
Since it’s pretty useless to run below 3 volts and even damaging for lithium battery packs, a low voltage cut-off is a very good idea. This way we can set the device state as ‘Unavailable’ in Home Assistant that will tell us that the battery is now dead. The typical cutoff voltage is 2.75V, so if we make our software ‘cut-off’ fire up at about 3.0 to 3.3 volts or so that would be a good and safe bet. Since we have some quiescent current flowing through the electrolytic capacitors, DC-DC and other parts of the circuit, we need to make sure we power down before we hit that voltage.
Battery packs may have no Battery Management System (BMS) at all (my case). And even if they do, the voltage may drop a little on it’s own, so it’s better not to stop very close to that limit. This will give the user a good time window to take out the battery and recharge.
My circuit has a voltage divider, so it’s only a matter of finding out what we need to do to enter deep sleep forever when the voltage drops below a threshold. Sounds like it’s not to hard, so let’s try it!
    - if:
        condition:
          lambda: 'return (id(bat).state < 3.2);'
        then:
          - mqtt.publish:
                  topic: "$devicename/status"
                  payload: "offline"
                  retain: true
          - deep_sleep.enter:
              id: sleepy
              sleep_duration: 0s
See that mqtt message? That’s a replacement for our will messages we commented out earlier. I thought it would be a good idea to report that the battery died by explicitly marking all entries as ‘Unavaliable’ in the UI.
To reset that state we need something like his at the very start of the script (or an uncommented birth_message):
    - mqtt.publish:
            topic: "$devicename/status"
            payload: "online"
            retain: true
Appendix A: Full sources of my firmware
It just isn’t worth github or gist.
esphome:
  name: $devicename
  platform: ESP8266
  board: esp_wroom_02
  build_path: build/esp8266auto
  on_boot:
    - priority: -300
      then:
        - script.execute: check_stuff

substitutions:
  devicename: "cryotool"

logger:
  baud_rate: 0
  level: NONE

wifi:
  power_save_mode: LIGHT
  fast_connect: true
  networks:
  - ssid: frostgate
    password: neverland2
  manual_ip:
    static_ip: 192.168.143.31
    gateway: 192.168.143.1
    subnet: 255.255.255.0
    dns1: 192.168.143.1

ota:
  safe_mode: True
  password: updateme
  on_end:
     then:
      - lambda: |-
          id(ota_mode) = 0;
      - mqtt.publish:
          topic: "$devicename/ota"
          payload: "OFF"
          retain: true

status_led:
  pin: GPIO15

dallas:
  - pin: GPIO12
    id: dallashub
    update_interval: never

#api:

mqtt:
  id: mqtt_cli
  broker: homeblade.home
  birth_message:
  will_message:

deep_sleep:
  id: sleepy


globals:
  - id: updates
    type: int
    restore_value: no
    initial_value: '0'
  - id: ota_mode
    type: int
    restore_value: no
    initial_value: '0'
  - id: session
    type: int
    restore_value: no
    initial_value: '0'
  - id: naptime
    type: int
    restore_value: no
    initial_value: '300'

script:
  - id: check_stuff
    then:
    - mqtt.publish:
            topic: "$devicename/status"
            payload: "online"
            retain: true
    - lambda: |-
        id(mqtt_cli).subscribe("$devicename/ota", [=](const std::string &topic, const std::string &payload) {
          id(ota_mode) = (payload.compare("ON") == 0);
        });
        id(mqtt_cli).subscribe("$devicename/session", [=](const std::string &topic, const std::string &payload) {
          id(session) = (payload.compare("ON") == 0);
        });
    - lambda: |-
        id(updates) = 0;
        id(bat).update();
        id(dallashub).update();
        id(dhts).update();
    - wait_until:
        lambda: |-
          return (id(updates) >= 4);
    - lambda: |-
          float df = abs(id(dht_temp).state - id(water_temp).state);
          id(water_air_diff).publish_state(df);
          if (df > 4.0) {
            id(water_presense).publish_state(1);
            id(naptime) = 60;
            id(bath_temperature_current).publish_state(id(water_temp).state);
            id(bath_water_air_difference_current).publish_state(df);
          } else {
            id(water_presense).publish_state(0);
            id(naptime) = 420;
          }
    - if:
        condition:
          lambda: 'return (id(session) == 1);'
        then:
          - lambda: |-
              id(bath_temperature_last).publish_state(id(bath_temperature_current).state);
              id(bath_water_air_difference_last).publish_state(id(bath_water_air_difference_current).state);
          - mqtt.publish:
              topic: "$devicename/session"
              payload: "OFF"
              retain: true

    - logger.log:
        format: "Sleeping for %d | OTA: %d SESSION : %d"
        args: [ 'id(naptime)', 'id(ota_mode)', id(session) ]

    - if:
        condition:
          lambda: 'return (id(bat).state < 3.2);'
        then:
          - mqtt.publish:
                  topic: "$devicename/status"
                  payload: "offline"
                  retain: true
          - deep_sleep.enter:
              id: sleepy
              sleep_duration: 0s

    - if:
        condition:
          lambda: 'return id(ota_mode) == 0;'
        then:
          - deep_sleep.enter:
              id: sleepy
              sleep_duration: !lambda |-
                  return id(naptime) * 1000;

binary_sensor:
  - platform: template
    id: water_presense
    name: "$devicename Bath Has Water"

sensor:
  - platform: dht
    pin: GPIO0
    model: DHT11
    id: dhts
    temperature:
      name: "$devicename Temperature"
      id: dht_temp
      on_value:
        lambda: |-
          id(updates)++;
    humidity:
      name: "$devicename Humidity"
      on_value:
        lambda: |-
          id(updates)++;
    update_interval: never
  - platform: adc
    id: bat
    pin: GPIO17
    name: "$devicename Battery Voltage"
    filters:
      - multiply: 6
    update_interval: never
    on_value:
      lambda: |-
        id(updates)++;
  - platform: dallas
    index: 0
    id: water_temp
    name: "$devicename Water Temperature"
    on_value:
      lambda: |-
        id(updates)++;
  - platform: template
    id: water_air_diff
    icon: "mdi:coolant-temperature"
    name: "$devicename Temperature Difference"
    unit_of_measurement: "°C"
    update_interval: never

  - platform: template
    id: bath_temperature_current
    icon: "mdi:coolant-temperature"
    name: "$devicename Bath Temperature"
    unit_of_measurement: "°C"
    update_interval: never
  - platform: template
    id: bath_water_air_difference_current
    icon: "mdi:coolant-temperature"
    name: "$devicename Bath Water/Air Difference"
    unit_of_measurement: "°C"
    update_interval: never
  - platform: template
    id: bath_temperature_last
    icon: "mdi:coolant-temperature"
    name: "$devicename Bath Temperature (Last)"
    unit_of_measurement: "°C"
    update_interval: never
  - platform: template
    id: bath_water_air_difference_last
    icon: "mdi:coolant-temperature"
    name: "$devicename Bath Water/Air Difference (Last)"
    unit_of_measurement: "°C"
    update_interval: never
Appendix B: Interesting reads about CWI at pubmed
Not an investment strategy a medical advice. Just a fun read. Make sure you have a good look around for more, since I didn’t take the effort to note all the cool stuff I found there back in summer.
https://physoc.onlinelibrary.wiley.com/doi/full/10.1113/EP086283
Nice project!! I’m diving into ESPhome now and finding it very easy to integrate!
Before knowing the project i was hardcoding my sensors and made a good discovery that can improve your project (if it can be done in ESPHome).
The current of the DHT11 is enought to drop a little the battery time! The ESP32 that i used have a port sink current greater than the current needed to the DHT11 make a mesurement, so i let the DHT VCC pin on VCC and the GND i attach to a GPIO that keeps pulled up when deep sleeping. When i wake the ESP ai write the GPIO to zero to turn the DHT on.
I was getting 7 days and it jumped to 9 or something!
Thanks for this. I hadn’t thought about basically turning off the ESPHome loop and coding everything in a script.
a very nice project!
I tested the script, and as you probably noticed, there are times when the OTA command doesn’t work correctly. for ESP32 it’s not a major problem, I noticed that after a few connections to the MQTT server, ESP32 goes into OTA mode, but ESP8266 does not.
So I propose to add some delay times before and after the OTA mode check. i.e. something like that:
…
– delay: 20ms
– lambda: |-
id(mqtt_client).subscribe(“$devicename/ota”, [=](const std::string &topic, const std::string &payload) {
id(ota_mode) = (payload.compare(“ON”) == 0);
});
– delay: 20ms
…
I know this will affect power consumption, but it seems that for ESP8266 it doesn’t work without delay. at least it did in my case.
thanks!
This is really weird, in my case it worked flawlessly during all the time I’ve been debugging the firmware. Make sure you tell the other side to put the retain flag on the message. If that’s not the problem, I’d have a good look at the router logs (I’m using an OpenWRT-flashed router). Perhaps there are connection drops there (Disassoc on low ack?). The fact that it works on esp32 makes me think it will might be something with wifi.
it seems you’re absolutely right.
I put the hold flag on the message, but I didn’t reboot to homeassistant after that. it seems that the settings for MQTT only take effect after the reboot. it may be a problem with my homeassistant…
I removed the delays and retested with both ESP32 and ESP 8266. it works without any problems.
In any case, I realized something while testing your app. if the power goes out (for whatever reason), and the MQTT server becomes unavailable, the esp will try to connect to the server all the time, and it will drain the battery. so i’ll think about how to modify it to go into deep sleep after a few tries.
Yeah, it’s a known bug. I worked it around by eventually moving MQTT server to my OpenWRT router which so far looks like the best option: very rare reboots and only for a few minutes during the update.
The more complex stuff I haven’t yet solved – aggregating the data into grafana/influxdb for detailed analysis along with other health data.
Hi, thanks for sharing your solution ! I tried to implement it, but still got a problem. It seems I can’t access the “ota” topic when in the “check_stuff” script. I reduced the code to this:
– lambda: |-
ESP_LOGI(“custom”, “>>>>>>>>>Custom message2”);
id(mqtt_cli).subscribe(“thermo-garden/ota_mode”, [=](const std::string &topic, const std::string &payload) {
ESP_LOGI(“custom”, “>>>>>>>>>Custom message3”);
});
ESP_LOGI(“custom”, “>>>>>>>>>Custom message4”);
The log for message 3 never appears. I switch the topic payload using MQTT Explorer with retain flag set to true. Also tried to push the payload value with nodered. Same result.
MQTT is connected before starting the script according to the logs. I don’t know what else to check. Do you have an idea?
Regards
Check out if you are posting the message with the ‘retain’ flag set. Otherwise you’ll only get the message once it’s posted again.
Thanks for your answer. I check everything, and ended up beginning from scratch again. I found out the subscription seems to be asynchronous and might be the cause. I added other variables to tackle that.
I dont think you need a script for all this. you can just keep the device awake until the message is sent.
I use something like this. It will connect to HA wiats for the sensor to send data and then shuts down again.
esphome:
name: paarsekamer-temp-sensor
on_boot:
– wait_until: api.connected
– component.update: temp_sensor
9 days of batterylife is pretty bad though. It must be possible to get 6 months of battery out of such a thing. I bought a few shelly plus H&T devices which updates the HA states not as often only on a 0.5 degree temperature change but the screen will update on every change. This device easily hits 6 months of battery life on 4 AA batteries.
I guess this should also be possible with a d1 mini. but i cant figure out how
Please note, that I’ve been using the shittiest LiIon batteries I had, that had less than 400mAh of juice. It would take waaay more time to test on a more juicy cell 😉
HA is more often offline due to updates than an MQTT server, besides it’s HA that initiates connection, not esphome. And it takes up to 10 seconds to do so. In case of MQTT you just spit out the messages and off you go back to sleep.
In the end, I got about 2-3 months out of a decent 18650 cell that has at least about 1500mAh. But I also optimized some things, like used MQTT server IP instead if DNS. It would require changing the schematics of the board to get more than that: (like, power down the DHT sensor during sleep, use a more efficient DC-DC and other stuff)